
Peter Damm Guitarmaker
Repairs, Maintanance and Newly Created Musical Instruments
In this section you will find:
Tele neck too thick nov 2012
Grand Chinese Selmer Copy One-part bridge and no voice at all sept/okt 2012
Gibson Les Paul Neck too thick and bulky sept/okt 2012
Guild headstock repair 2011/12
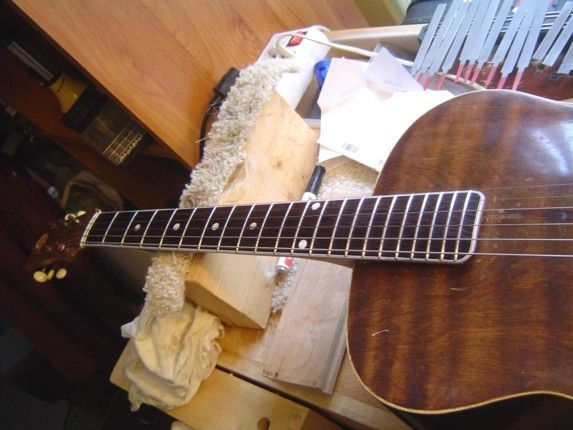
Carmen N-6 classical broken sides repair (July 2010)
Eko acoustic 12-string bridge repair (July 2010)
Remco his Epiphone Guitar wider nutspacing new frets
Amka Jazzguitar. full restoration
Story of Amka Guitars. by Ubel Zuiderveld
Epiphone Zephyr 1953/54 small restoration job
Note: Only the interesting repairstories will be showed on this site
================================================
Tele neck too thick


============================================================
Grand Chinese Selmer Copy
The Bridge on this Chinese 'Grand' Selmer copy was only one part and very heavy. Nothing decent was coming out the soundhole. It took me a while to think it over if it was worth the while, this being a Chinese guitar. But after careful examination I saw that it was actually well made. A few flaws, but still. The fretboard is flat, the topnut was too heavy and with the wrong distances for the strings in relation to the fretboard. Things like that, but the woodwork is fine!


=========================================================
Gibson Les Paul
The back of the neck on this Gibson Les Paul Standard was too heavy for my customer. He wanted me to shave it down. I do that with a rasp and other fine files. For my own sake I wanted him to confirm that in writing, because it is not reversable, and not everyday that someone asks me that.


=================================================================
Guild headstock repair 2011/12


Carmen N-6 classical broken sides repair


==============================================
Remco his Epiphone Guitar
My Musical Partner Remco plays an acoustic nylonstring classical guitar.
When we bought this Epiphone Emperor Jazz Guitar a very long time ago
it was very difficult for him to play it, because of the narrow spacing of
the topnut. I finally found the time to solve that problem for him.

The really funny story is that when I tried to decode the serialnumber, I found
out that this Guitar was actually made by the Peerless Guitar Factory in Korea!!!!
It was made in Januari 1996.
And as a few of you out there may know I'm a Peerless Guitars Endorser!


=================================================================
Amka Jazzguitar.
Built in The Netherlands between 1938 - 1943
The owner bought it a few years before the war he told me,
so 1938 is pretty close I would say.


Toprow from left to right: Nameplace and/or Country
Banjo: Wassenaar,Holland / Wife of Jan Mergler / Amka Guitar: Jan Mergler / Violin: Delft,Holland
Bottomrow from left to right: Nameplace and/or Country
Frenchman, played clarinet with the Hot Club Du France (Django Reinhardt).
Trumpet: Delft,Holland / Trumpet: Chech / Piano: Delft,Holland / ?: Belgian (standing)
The owner is already 90 years of age and still plays!
In the second World War he took his guitar with him,
probably to play somewhere, when the Russians somehow
stopped him and tried to take his guitar away at gunpoint,
but at that very same moment a few English Bommers flew over and
the Russians took shelter. This was his chance to escape with his guitar!
He jumped in a ditch and away he went.
The reason the man and this guitar survived!
A wonderful story!


Put some Thomastik JS112 Jazz Flatwounds on this Jazzer.
These Jazz-strings have a somewhat lower tension and for this oldie it is much better.
The neck is made of beech, not the best choice obviously, but still.
There is no trussrod to support the tension.
I sanded a little backbow in the fretboard, so the tension of the strings have to bend
the relief into the neck. It's a calculated risk.


=========================================================
Story of Amka Guitars.
Gitaren van Amka zie je zelden of nooit op een vintagebeurs in ons land. Toch zijn ze afkomstig van een ooit bekend Nederlands geslacht van luthiers. Graven naar de wortels van een Nederlandse gitaarpionier, een geactualiseerd verhaal uit 2003.
DOOR UBEL ZUIDERVELD © UZ MEDIA 2003
Volledige versie inclusief foto's op de volgende link!
http://www.uzmedia.nl/index.php?itemid=1022
Mijn nieuwsgierigheid naar Amka werd gewekt door een paar zinnen in The Blue Book of Electric Guitars van Blue Book Publications. Deze Amerikaanse uitgever brengt gezaghebbende naslagwerken uit, waarin gegevens zijn gerangschikt over instrumenten, hun herkomst, hun achtergrond en de waarde op de verzamelaarsmarkt.
Over gitaren van het merk Amka staat in The Blue Book het volgende te lezen: 'De muziekinstrumenten onder de naam Amka werden oorspronkelijk gebouwd in Nederland door de familie Veneman. Later verhuisde Kope Veneman naar de Verenigde Staten en hij opende een muziekwinkel in Maryland. In de 1960s introduceerde Kope Veneman muziekinstrumenten onder het merk Kapa, met een kroonlogo dat identiek was aan het Amka kenmerk dat zijn vader gebruikte.'
Kope Veneman werd geboren in Enschede, 1923. Via omzwervingen langs Haarlem en Amsterdam, kwam het gezin Veneman in Den Haag terecht. Daar opende Kope's vader een kleine muziekwinkel, Veneman Muziek. Pa (Albert) Veneman bouwde violen, geen gitaren, een instrument waarmee hij zich eigenlijk niet wenste in te laten. Senior fronste dan ook de wenkbrauwen toen zoon Kope zich bij hem vervoegde met het voorstel gitaren te gaan bouwen.
Veneman junior zag in deze instrumenten een nieuwe markt. Kope wist dat in Amerika de gitaar sinds de 1920s aan populariteit won ten koste van andere snaarinstrumenten. Hij kende de modellen waarmee Gibson een voortrekkersrol vervulde binnen de Amerikaanse jazzmuziek, gitaren met een licht gewelfd bovenblad en vioolsleuven als klankgaten. Pa Veneman waagde zich aan het experiment dat zijn zoon voorstelde, maar had niet zo gek veel vertrouwen in diens voorspelling dat de gitaar in Nederland een populair instrument zou worden. 'Ik bouw ze als jij ze weet te verkopen,' sprak vader Veneman dus diplomatiek.
In 1938 werd bij Veneman Muziek in Den Haag de eerste jazzgitaar gebouwd, ruim een jaar voordat Neerlands oergitarist Eddy Christiani ('De eerste elektrische gitarist van Europa') een archtop van Epiphone kocht om in de voetsporen te treden van zijn Amerikaanse voorbeeld Charlie Christian. Vioolmaker Veneman maakte mallen, zoon Kope assisteerde.
'Je kunt er gerust vijftig per week maken,' sprak Kope vol vertrouwen tot zijn vader. Hij beschaamde dit vertrouwen niet. Kope Veneman kreeg het gelijk volledig aan zijn zijde. Muziekwinkels in Nederland hadden destijds niet of nauwelijks gitaren in de verkoop en kwamen helemaal droog te staan toen aan de vooravond van de Tweede Wereldoorlog de Amerikaanse import stagneerde.
Onder aanvoering van Christiani, bijgenaamd The Dutch Windmill, won de gitaar aan invloed. De Venemans verrichtten pionierswerk met hun instrumentenbouw. De jazzgitaren uit Den Haag vonden gretig aftrek. Achttien gulden kostten ze destijds, herinnert Veneman zich. Als merknaam werd Amka bedacht, samengesteld uit de eerste letters van de namen van het gezin Veneman, vader Albert, moeder Madeleine en de zonen Kope en Albert. Amka Gitaren in Den Haag floreerde.
Toen kwam de oorlog. Met kunst- en vliegwerk wisten de Venemans de instrumentenbouw tot 1943 overeind te houden, maar in dat jaar werd het materiaalgebrek te nijpend om nog jazzgitaren te kunnen maken. Amka moest het noodgedwongen voor een paar jaar voor gezien houden.
Na de Tweede Wereldoorlog kon de draad weer worden opgepakt. Vanzelfsprekend werden opnieuw jazzgitaren gemaakt, maar dit keer bleef het hier niet bij. Het assortiment werd uitgebreid met Hawaian gitaren ofwel lapsteels, de elektrische schootgitaren. Hiernaar was in ons land veel vraag vanwege het grote aantal groepen dat zich liet inspireren door de muziek van het zonnige eiland, staat nummer 50 van de USA. Aan het begin van de 1950s viel het doek voor Amka gitaren. Alles opgeteld zijn er ongeveer 7000 Amka's gebouwd.
In 1951 zette Kope Veneman een punt achter zijn loopbaan in de Nederlandse muziekhandel, pakte hij zijn biezen en verhuisde hij naar de Verenigde Staten. Het avontuur in het land van de jazzgitaar lonkte. Na wat omzwervingen vestigde Kope (al spoedig Koob op z'n Amerikaans) zich in de buurt van Washington, waar hij een kleine muziekwinkel opende. De Nederlander verkocht er elektrische gitaren - nog voor de doorbraak van The Beatles. Hij werd daarbij ook nog importeur van de instrumenten van de Duitse fabrikant Höfner. 'Ze speelden goed, maar zagen er verschrikkelijk uit,' is anno 2004 het oordeel van de 80-jarige Koob Veneman. 'Die rare gitaren met die coverings van plastic. Ik heb ze aangesproken op hun design toen ik op de vakbeurs in Frankfurt was. Ik vroeg ze andere designs te maken, die het beter zouden doen op de Amerikaanse markt, maar dat wilden ze bij Höfner niet.'


===========================================================
Epiphone Zephyr 1953/54
Epiphone Zephyr 1953 / 1954


